How to install a printer and set up secure printing
Guides on how to install an AU printer and set up secure printing are available here. The guides are divided into PC, Mac and Linux.
FollowME print - Mac and Windows
On Aarhus University FollowME print will be gradually introduced beginning in 2023.
Do I have FollowME in my area?
Yes, if you're met by a login screen on your local MFP (Multifunction printer) it is because the MFP is setup to use the AU FollowMe print solution.

FollowME on AU
On AU, for employee FollowME print, we use a Hybrid Cloud Print FollowME solution from Y-soft, named HCP Ysoft cloud print, but going by the name HCP Follow-ME.
Print to FollowME by printing to the HCP FollowME print queue on you Windows or Mac PC.
You can also have HCP FollowMe setup on your Linux PC. Please contact you local IT support for details.

The print queue should be available on your PC, provided you're in an area where HCP FollowME has been introduced.
If you do not have the HCP FollowME print queue, and provided you're in an area where HCP FollowME has been introduced, please contact your local IT support.
Print release at the MFP
After you print to the FollowME queue, the print can be collected at the nearest FollowME multifunction printer (MFP).
Card registration
First time you login to a FollowME multifunction printer (MFP) your card needs to be registered in the system.
You do that your self on the MFP.
Please also see details on the posters hanging by the MFP.
1. Scan your card and enter your AU user ID (AUxxxxx) and password. Your card is now registered for future use.
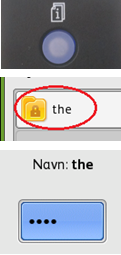
2. Release your print by pressing the "pull print" icon.
 On the Ricoh MFPs it looks like this >>
3. Select any/all jobs and press Print.

4. Log out after releasing your print
Scan to mail and copying can also be performed directly after login.

How to install a printer
- Find the name of the printer you want to install (the name is often written on a label on the printer. The location of the printer (building number and room number) is part of the printer’s name.)
- Click the ‘Install Printer’ shortcut on your PC’s desktop. If this shortcut is not available, write ‘\\prt11.uni.au.dk’ in the address bar in ‘File Explorer’.
- You must now find the printer you want to install. You can use the search field in the top right-hand corner to search based on building number.
- When you have found the relevant printer, double-click on the printer.
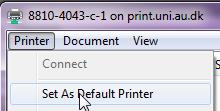
- When the dialogue box is displayed, the printer is installed. If relevant, you can select ‘Printer – Set as default Printer’ in the dialogue box to ensure that this printer is automatically used when you print.
If you want to install more than one printer, repeat the procedure above.
If you install a printer on a PC which is not part of the domain, you will be asked to enter user ID and password. Please use your UNI user ID in the following format AU"auid"@uni.au.dk - For example AU229706@uni.au.dk and enter your password.
How to set up secure printing for Konica
1. Click Windows ‘Start’ (bottom left on the screen).
2. Select/search for ‘Devices and Printers’.
3. Right-click on the printer and select ‘Printing Preferences’.
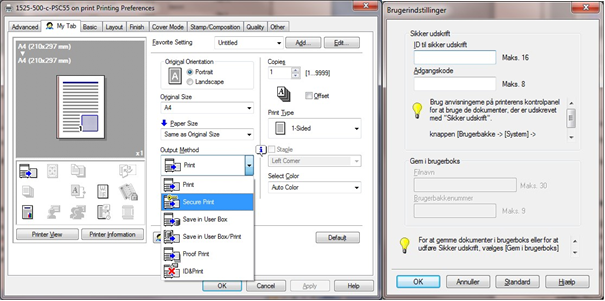
4. Select ‘Secure Print’ under ‘Output Method’ and enter user ID and password.
5. Then click ‘OK’.
The printer is now ready but will not print until you release the print job via the printer’s display. See how to do this below.
How to release a secure print job
This guide will show you what to do on the printer – not on your computer.
Applies to C220, C280, C360 and C650:
- Press the ‘Boks’ (box) button below the display and select the display button ‘Brugerbakke for sikker udskrift’ (tray for secure printing).
- Enter user ID and press the display button ‘OK’. Enter password and press the display button ‘OK’.
- Select the print job/jobs you want to print
- Press ‘Start’.
Applies to C224, C2804, C364 and C654:
- Press the ‘Menu’ button at the top right.
- Press the ‘Brugerbakke (Brg.bakke)’ (user tray) display button
- Select ‘Sikker udskrift’ and log on using the secure print ID and the password you have chosen.
- Select the print job/jobs you want to print and then print (Udskriv).
Applies to C450i, C650i
1. Press the display button ”Brg.bakke" or ”Boks”
2. Press the display button ”System".
3. Select ”Sikker udskrift” and log on using the secure print ID and the password you have chosen.
4. Select the print job/jobs you want to print and then print (Udskriv).
How to set up secure printing for Ricoh
1. Click Windows ‘Start’ (bottom left on the screen).
2. Select/search for ‘Devices and Printers’.
3. Right-click on the printer and select ‘Printing Preferences’
4. Mark "Locked Print" in "Output Method", then open "Details". Select "Windows Login Name" and enter a 4-8 digit pin/password.

5. Click "OK", "OK"
The printer is now ready but will not print until you release the print job via the printer’s display. See how to do this below.
How to release a secure print job
This guide will show you what to do on the printer – not on your computer.
Press "Quick print release" (Danish menu: "Lynprint")

Choose your user ID and enter the pin/password you selected above and press "OK"

You can now select and release the stored job(s)

How to set up secure printing for a Xerox WorkCentre 78xx printer
How to set up secure printing with a password on your PC
- Click Windows ‘Start’ (bottom left on the screen)
- Select/search for ‘Control Panel’
- Select ‘View devices and Printers’
- Right-click on the printer and select ‘Printing Preferences’
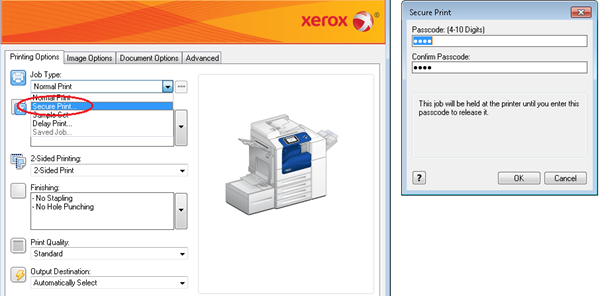
5. Select ‘Secure Print’ under ‘Job Type’ and enter an optional password.
6. Then click ‘OK’.
The printer is now ready but will not print until you release the print job via the printer’s display. See how to do this below.
How to release a secure print job on the printer
-
Press the button ‘Job Status’.
- Click the folder with your user ID
- Enter the password you selected above and then press ‘OK’
- Select the relevant print jobs and click ‘Frigiv’ (release) or ‘Frigiv alle’ (release all)

![]()
How to set up secure printing for a Xerox AltaLink C80xx printer
How to set up secure printing with a password on your PC
- Click Windows ‘Start’ (bottom left on the screen).
- Select/search for ‘Control Panel’.
- Select ‘View devices and Printers’.
- Right-click on the printer and select ‘Printing Preferences’.
5. Select ‘Secure Print’ under ‘Job Type’ and enter an optional password.
6. Then click ‘OK’. The printer is now ready but will not print until you release the print job via the printer’s display.
See how to do this below.
How to release a secure print job
If you have a Xerox Altalink C80XX printer, you must do the following:
- Press ‘Jobs’.

- Select ‘Secure jobs’
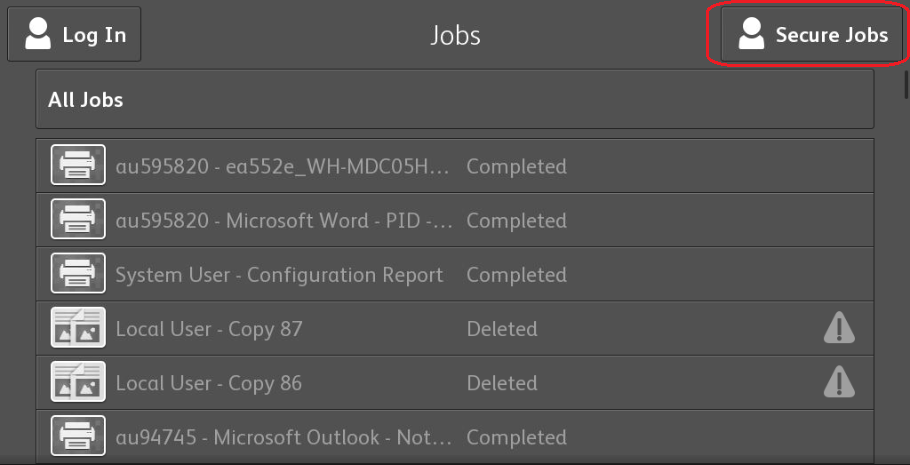
- Select your folder
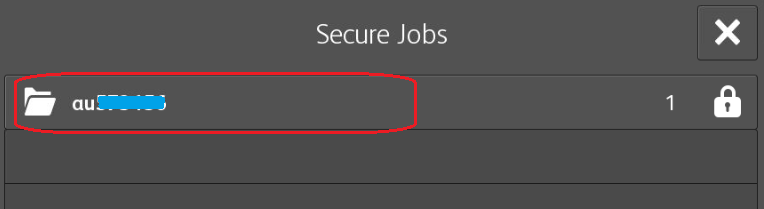
- Enter the password you selected when you set up the secure print job
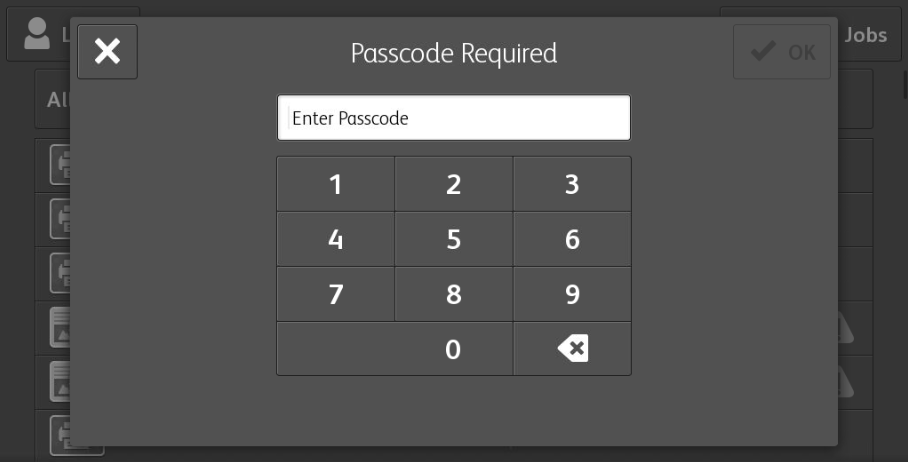
- Release the job(s) you want to print

How to set up secure printing for a Xerox printer
How to configure secure printing and printing on a Xerox printer
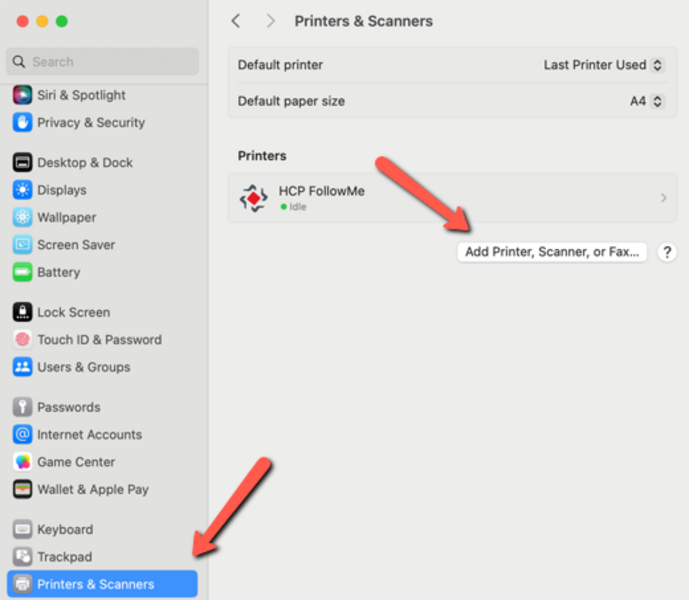
How to install a printer – Linux
wget https://munki.au.dk/public/install_au_printer.sh
chmod +x install_au_printer.sh
./install_au_printer.sh
FollowMe Print - Linux
How to set up ‘Scan to email’ on a Konica printer
This guide shows you what to do on the printer – not on the computer.
a) Scan to email account (LDAP/DS address book look-up) - Save in the local address book if relevant
b) Scan to email account registered in the local address book
c) Scan to manually entered email account.
____________________
a) Scan to Email account
- Press the button ‘Fax/Scan’ below the display
- Press the display button ‘Søg/søgning’ (search/searching)
- Enter the recipient’s first name and last name and press the display button ‘Start Søgning’ (start searching)
- Select the recipient
- If you want to save the recipient’s name in the local address book, you must press the display button ‘Registrer’ (register).
- Select the recipient(s) again and press the display button ‘OK’.
- Press the display button ‘Registrer/Gem’ (register/save).
- Press the ‘Start’ button.
Note: If relevant, mark the email address you created as ‘One Touch / Foretrukne’ (one touch/favourite)... See the last section
b) Scan to email account registered in the local address book
- Press the button ‘Fax/Scan’ below the display
- Press the display button ‘Adressebog’ (Address Book)
- Press the display button with the first letter in the person’s first name
- Select recipient(s)
- Press the ‘Start’ button
c) Scan to manually entered email account
- Press the button ‘Fax/Scan’ below the display
- Press the display button ‘Direkte indt.’
- Press the display button ‘E-mail’
- Enter the email address (‘@’ can be found under ‘2’. Press the display button ‘Skift’ (switch))
- Press the ‘Start’ button
On the front page of the address book, select the email address you have created and mark it as ‘One Touch/ Foretrukne’ (one touch/favorite)....
This only applies to C220, C280, C360 and C650 (Note: for all xx4 models, see below)
- Press the button ‘Funk./Tæller’ to the right of the display.
- Then select ‘Display punkt 1’ four times!
- (1. One-touch..., 1. Create one touch..., 1. Address book..., 1. E-mail)
- Select the recipient and press the display button ‘Rediger’ (edit).
- Press the display button ‘pil ned’ (arrow down) and then the display button ‘Index’.
- Select the display button ‘Foretrukne’ (favourite) and press the display button ‘OK’.
- Press the button ‘Funk./Tæller’ to the right of the display in order to finish...
Applies to C224, C284, C364 and C654
- Press the button ‘Menu’ to the right of the display
- Press the display button ‘Funktion’ (function) to the right
- Then select ‘Display punkt 1’ four times!
- (1. One-touch..., 1. Create one touch..., 1. Address book..., 1. E-mail)
- Select the recipient and press the display button ‘Rediger’ (edit)
- Select the display button ‘Foretrukne’ (favourite) and press the display button ‘OK’
- Use ‘Luk/OK’ (close/OK) to close all menus
How to set up scan to email on Xerox WorkCentre 78xx
How to set up scan to email on Xerox WorkCentre 78xx
Contents:
- How to add email addresses locally on the Xerox printer (the Device Address Book)
- How to mark an email address as a favourite so it will be available on the front page
- How to find a specific person at AU in the Network Address Book
How to add email addresses locally on the Xerox printer (the Device Address Book)
Always start on the front page: Press the ‘home’ button on the left side of the printer.
1. Press ”E-mail”![]()
2. Then press ‘Ny Modtager’ (new recipient)
3. Write your email address and select the address book

4. Select ‘Opret ny kontaktperson’ (add new contact person)
5. Press ‘OK’ (or click the address card or the email field in order to edit. You can also write your name in the field at the top)
The email contact has now been added.
How to mark an email address as a favourite so it will be available on the front page
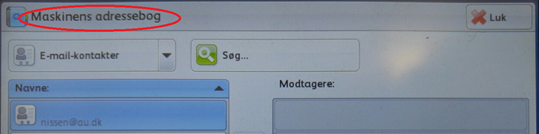
1. Press ‘E-mail’ and select ‘Maskinens adressebog’ (the Device Address Book)
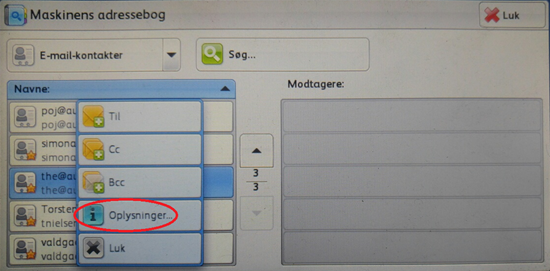
2. Select a contact person and press ‘Oplysninger’ (information)
3. Press the star to the right of the user information and then press ‘OK’
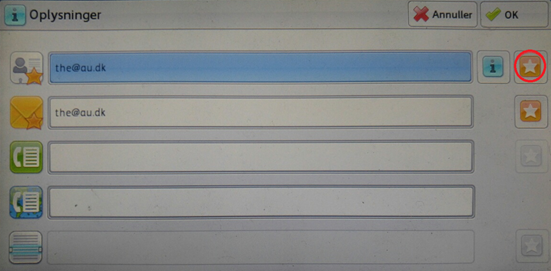
The email contact will then be marked as a favourite.
How to find a specific email address for a person at AU in the Network Address Book
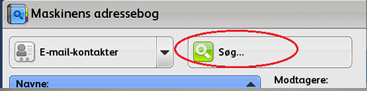
1. Press ‘Søg’ (search) in the local address book
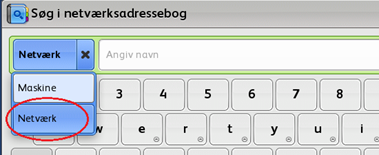
2. Switch to ‘Netværk’ (network) on the left.
3. Write first name and last name (e.g. ‘Thomas Ehler’) and then press ‘Søg’ (search).
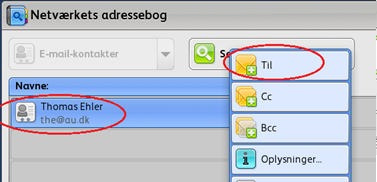
4. Select the recipient in question and select ‘Til’ (to) or ‘Cc’. The press ‘OK’.
When you are done, remember to remove your email from the start page: First press the ‘home’ button and then the ‘E-mail’ button. Then select your email/name and press ‘Fjern’ (remove).
How to set up scan to email on Xerox AltaLink C80xx
Follow the procedure below to scan from the printer to your email:
1. In order to be able to scan documents to your, your colleague’s or another person’s email, you must first select ‘Email’.
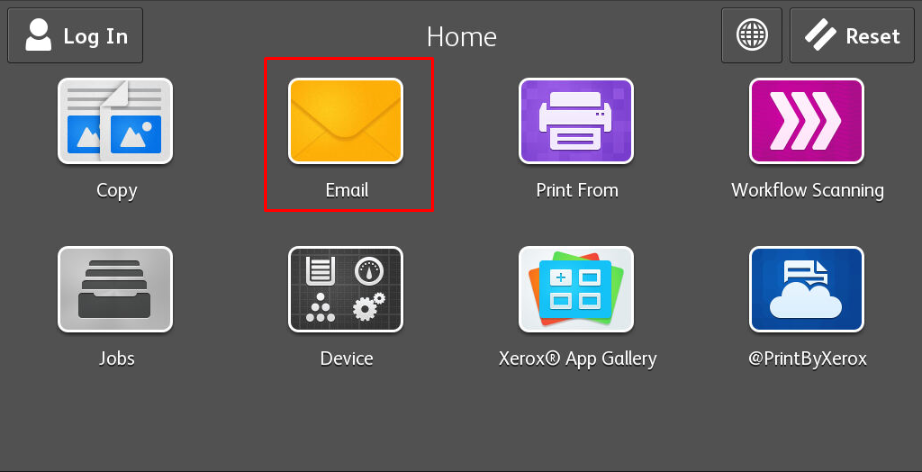
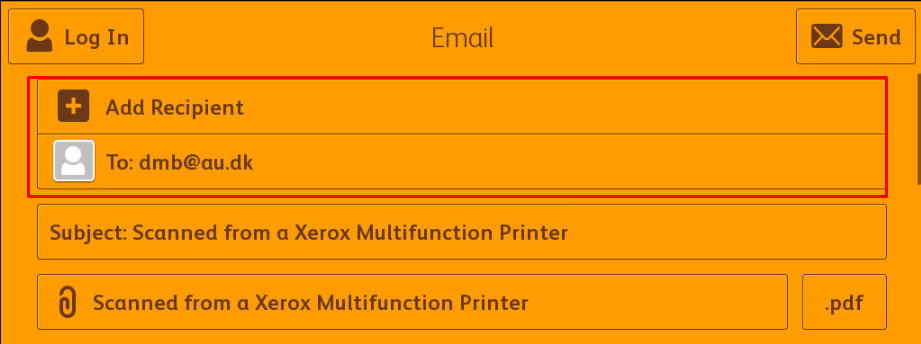
2. Press ‘Manual Entry’ to write the email you want to scan to
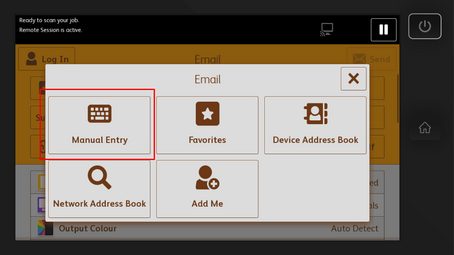
If it is not displayed automatically as illustrated below, then press ‘Add recipient’ and it will be displayed.
3. At the same time as you enter the email address you wish to scan to, you can also choose to add the email address to the address book to make it easily accessible the next time you want to scan. You can do this by pressing the little book icon to the right of the text box.
![]()
How to add the email address to the local address book
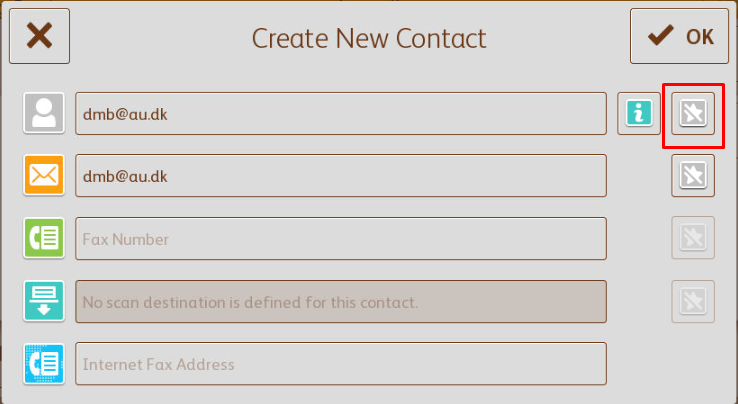
1. When you have pressed the little book icon, a new window will be displayed. The new window contains ‘Create New Contact’ or ‘Add to Existing Contact’. You should then press ‘Create New contact’.
A menu should then be displayed in which you can see the email address which you entered a few moments ago.
2. In order to add the email to the favourites address book to make it easily accessible, press the star marked on the screen image and press ‘OK’ in the top right-hand corner.
(You will now be able to find the email address under ‘Favorites’ instead of ‘Manual Entry’)
3. The email address you have entered/added to Favorites should now be displayed under ‘Add recipient’ as you can see here. Check that it is the correct email address(es) and press ‘Send’
![]()