How to get VPN access
VPN
When you log on to the virtual private network (VPN), it’s like working on a computer at AU: you have the same level of protection. In other words, your internet connection is encrypted, which makes it invisible to anyone who might want to intercept your data.
When do I need a VPN connection?
The following services are examples of when you need to log in to the VPN:
- O-drive
- Workzone
- License servers
Please note, however, that you can ONLY use the VPN for these services if you are working on AU-managed equipment. I.e., equipment issued and set up by your local IT support, such as your work computer.
When do I not need a VPN connection?
You can access the following services without being logged in to the VPN:
- Microsoft 365 services such as Teams, email, Office, SharePoint, OneDrive, etc.
- Zoom
- Brightspace
This is a VPN setup guide for employees at AU. You can use VPN to access some of AU’s services from home (i.e. access to shared drive) even though these services are usually only available when you are on the university’s network.
How to log on to VPN from your AU PC (Windows)
How to log on to VPN from your AU PC (Windows)
In order to log on to VPN, Cisco AnyConnect must be installed. In general, Cisco AnyConnect is already installed on AU PCs. If this is not the case, please follow the guide below how to install the client on your AU computer.
Note that you can only use the VPN network if you’re working on AU equipment – that is to say, equipment provided and installed to you by AU, such as your work computer.
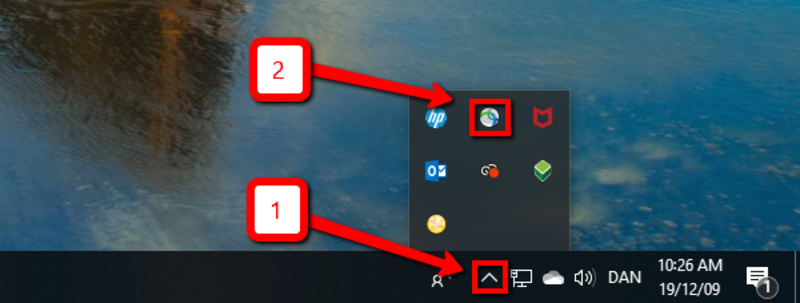
1. Click the small arrow in the task bar at the bottom right-hand corner of the screen.
2. Click the Cisco AnyConnect icon.
If you cannot see the icon, search by writing ‘Cisco Secure Client’ in the start field and try to open the program this way.
3. In the field, write ‘remote.au.dk/’ followed by your faculty abbreviation. The faculty abbreviations are: ARTS, BSS, FA (the central administration), HE, ST.
Note! You will find a complete list of availble VPN tunnels below under "VPN Tunnel overview"
4. Click ‘Connect’.

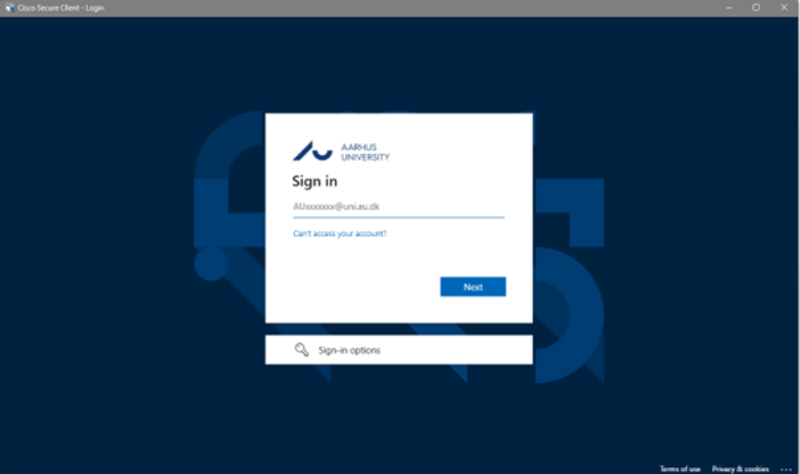
6. Enter the password you use to log on to your AU PC or mit.au.dk
7. Select your MFA (Two-factor authentication) method and follow the onscreen instructions on how to authenticate.
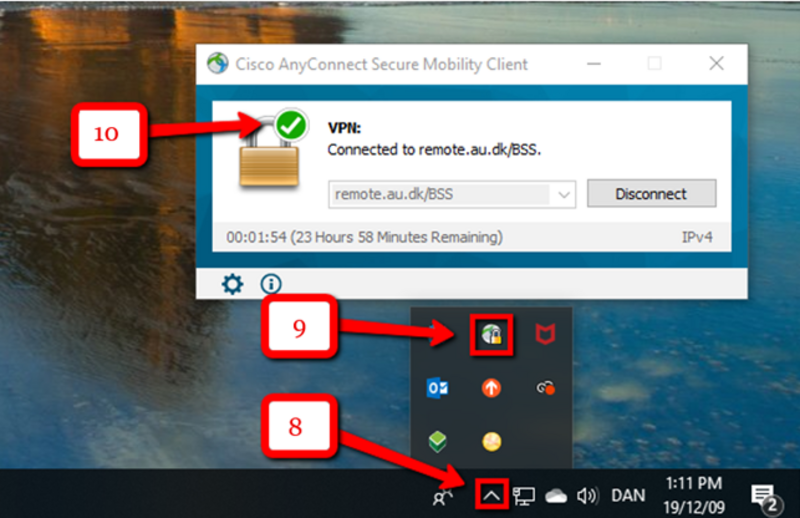
8. You can now check to see whether you are connected to VPN by clicking the small arrow in the task bar.
9. Then click the Cisco AnyConnect icon.
10. If you see a green checkmark on a padlock, you are connected to VPN.
How to log on to VPN from your AU Mac OS
How to log on to VPN from your AU Mac OS
In order to log on to VPN, Cisco AnyConnect must be installed. In general, Cisco AnyConnect is already installed on AU PCs (Mac OS). If this is not the case, please follow the guide on how to do this in the section ‘How to install the VPN client on a Mac OS’.
Note that you may only use the VPN network if you’re working on AU equipment – that is to say, equipment provided and installed to you by AU, such as your work computer.
How to log on to VPN
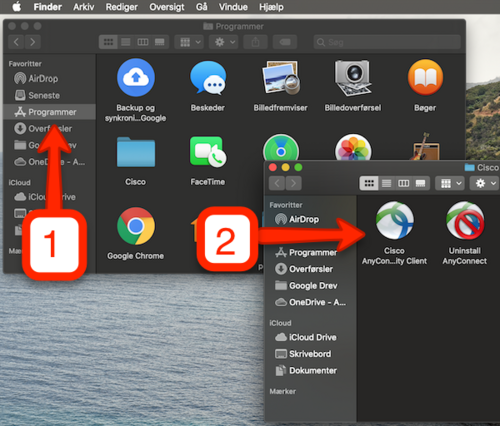
1. Open the folder ‘Programs’
2. Find the Cisco AnyConnect Client and double-click.

How to install the VPN-client on PC or Mac
How to install the VPN-client on PC or Mac
If you do not have access to VPN on your AU computer, you may first need to install the Cisco AnyConnect client (Part of Cisco Secure Client).
You might need to set up Two-Factor authentication in order to use the download link.
VPN Client for Windows
1. Click on the link Windows Cisco Secure Client
2. In the upper right corner, click on the download icon and then click on the Cisco Secure Folder
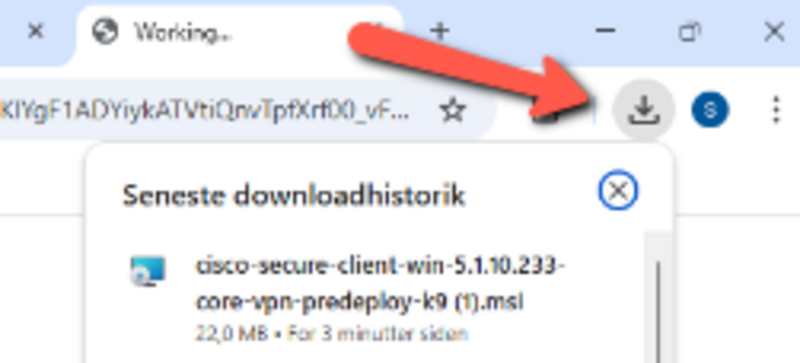
3. Follow the on screen instructions. Please note that your local administrator rights in Heimdal needs to be assigned in order to install the package.
4. Once the install finishes, you can open your VPN Client by searching for “Cisco Secure Client”.
If you need to install the client for a Windows (Arm64) version, this can be downloaded from software.au.dk
VPN client for MacOS
1. Click onthe link MacOS Cisco Secure Client
2. Open the downloaded package and follow the on screen instructions. Please note that your local administrator rights in Heimdal needs to be assigned in order to install the package.
3. Once the install finishes, you can open your VPN Client by searching for “Cisco Secure Client”.
How to install and login to VPN client on Linux
How to install and login to VPN client on Linux
If you do not have access to VPN on your AU Ubuntu Linux computer, you may first need to install the Cisco AnyConnect client (Part of Cisco Secure Client).
You might need to set up Two-Factor authentication in order to use the download link.
Install VPN client for Ubuntu Linux:
- From a web browser connect to https://software.au.dk
- Type in your credentials e.g. [[email protected]] and your password and then approve two-factor authentication
- Find and click the link to download and save the Cisco Client file according to your type of Linux OS
- Open a command prompt (e.g. open Terminal)
- Switch to the folder of the downloaded file.
- Enter: tar -vxzf cisco-secure-client-??????-filename.tar.gz for unpacking content to a folder
- Enter: cd cisco-secure-client-??????-foldername/vpn/ for the path to the installer script
- Enter: chmod u+x vpn_install.sh to make the setup file executable.
- Enter setup: sudo ./vpn_install.sh or sudo /bin/sh vpn_install.sh
When completed, you will see "Done!" and be returned to an empty
prompt.
To establish a VPN connection from GUI:
Make sure to have a proper network connection
- Launch the Cisco Secure Client from the "Application Menu" or invoke the following command: /opt/cisco/secureclient/bin/vpnui
- Type "remote.au.dk" in the "Connect To" field and click "Connect"
- Select the group that corresponds to your affiliation (ARTS, BSS, HE, ST or just AU-ACCESS).
- Type in your credentials e.g. [[email protected]] and password and click "Connect"
- Then approve two-factor authentication
A window will appear indicating that a successful connection was established.
Installation guides and logon with two-step authentication for consultants
Installation guides and logon with two-step authentication for consultants
Log on to VPN with two-step authentication
In order to improve security in connection with VPN access to AU’s network, it has been decided that two-step authentication (two-factor authentication) must be used.
How to register the consultant for two-step authentication
The external consultant’s AU contact person must ensure that the consultant is registered with the relevant email address and mobile phone number. Contact your local IT-support regarding the registration.
VPN installation and logon guide for consultants
VPN Tunnel overview
VPN Tunnel overview
Below you will find a list of the login options available on Remote VPN. Depending on your main area or whether you need special access to the development or support network, you must use the following logins:
- Central Administration/FA: remote.au.dk/FA
- HE: remote.au.dk/HE
- BSS: remote.au.dk/BSS
- ARTS: remote.au.dk/ARTS
- ST: remote.au.dk/ST
- IFR: remote.au.dk/IFR
- AU-ACCESS: remote.au.dk eller remote.au.dk/AU-ACCESS
- AUIT-Planlægning: remote.au.dk/AU-PLAN